Hello everyone!
Today, from our 1st floor, we’d like to share an easy introduction to bead embroidery for anyone who wants to give it a try!
Bead embroidery is a charming craft where you use beads to create beautiful designs on fabric. Even beginners can enjoy it—once you get the hang of a few simple tips, you’ll be able to make lovely pieces with ease.
In this post, we’ll walk you through the basic materials you need and the simplest stitching methods to help you start your bead-embroidery journey!

目次
Must-Haves for Beginners: Recommended Bead Embroidery Items
If you want to try bead embroidery but aren’t sure what to prepare, here are the essential items we recommend!
Recommended Items: Beads

A. Glass Beads
A must-have for bead embroidery. Small round beads or extra-small beads are most commonly used.
B. Sequins
Sew them on for extra sparkle ☆ They add a nice contrast to beads and look adorable.
C. Bugle Beads
Tube-shaped beads that make great accents in your design♪
D. Pearls
Perfect for the centers of floral motifs or for outlining your designs.
Recommended Items: Tools (Part 1)

E. Embroidery Hoop
This tool holds your fabric tightly in place. Keeping the fabric stretched prevents shifting and wrinkles, helping you create neat, even stitches. It’s especially essential for beginners.
F. Felt
Soft felt is recommended. It’s thick and stable enough that you can stitch beads directly onto it without using a hoop.
G. Embroidery Fabric
For beginners, a slightly thin cotton or linen with a tight weave works well. Choose a fabric that won’t snag your beads and is easy to stitch through.
H. Organza Fabric for Bead Embroidery
A light, sheer material. Since it’s transparent, you can easily see where your needle is going, making it easier to place your stitches. Its softness makes it great for delicate designs.
I. Beading Thread
Thread designed to pair well with beads. It has a nylon coating that keeps it from fraying or fuzzing. It also has a slight sheen that gives your work a more polished look.
J. Beading Needle
A needle made specifically for bead embroidery and beadwork. It’s thinner than regular needles, allowing beads to slide through easily. An essential tool for bead embroidery.
Recommended Items: Tools (Part 2)

K. Fabric Marker (Chalk Pen)
L. Craft Glue
M. Scissors
N. Bead Tray
O. Transfer Paper for Embroidery Patterns
P. Bead Mat
Basic Beading Stitches
Even if it’s your first time trying bead embroidery, learning just a few simple techniques will allow you to create beautiful patterns with ease.
Here are the basic stitches used in bead embroidery.
Each one is beginner-friendly and easy to incorporate into your projects. Give them a try and enjoy creating your own original designs!


Single-Bead Stitch
The single-bead stitch is the most basic technique, where you sew beads onto the fabric one at a time.
By placing beads evenly along the fabric, you can create fine dots and clean lines. This method works well for everything from simple patterns to more intricate designs.

① Bring the needle up through the fabric at the point where you want to place the bead. String one bead, then insert the needle back down to secure it.

② Bring the needle up again from the left side of the bead.

③ Pass the needle through the bead hole, then insert the needle into the fabric just below the bead.

④ Bring the needle up at the next point where you want to place your bead and repeat the same steps.

⑤ Your single-bead stitch is complete! ★
Continuous Bead Stitch
The continuous bead stitch is a method where beads are sewn in a connected line.
Instead of attaching them one by one, you stitch them consecutively to create smooth lines and band-like patterns. It’s perfect for borders and linear designs.

① Bring the needle up at the point where you want to start stitching the beads.

②Thread two beads onto the needle, then insert the needle back into the fabric at a point two-bead lengths ahead.

③Bring the needle up between the two beads you just stitched, then pass the needle through the hole of the second bead.

④Thread two more beads and repeat ①–③.

⑤Your continuous bead stitch is complete! ★
Single-Side Sequin Stitch
The single-side sequin stitch is a method where the sequin is attached only on one side.
By anchoring just one edge, the sequin moves lightly and creates a fluttery, delicate look. This technique is often used as a decorative accent.

①Bring the needle up, slide one sequin onto it, and insert the needle down through the left edge of the sequin.

②Bring the needle up again about halfway across the size of a sequin, slide on the next sequin, and attach it the same way as in ①

③Your single-side sequin stitch is complete! ★
Sequin with Bead Anchor
The sequin-with-bead anchor stitch is a technique where a sequin and a bead are sewn on together.
Using a bead keeps the sequin firmly in place while adding extra decorative detail. It’s perfect for areas where you want the design to stand out.

①Slide a sequin and then a bead onto the needle.

②Insert the needle back down through the sequin’s center hole.

③Done!★
Overlapped Sequin Stitch
The overlapped sequin stitch is a technique where multiple sequins are layered and sewn on top of one another.
By overlapping them, you can create a dimensional, luxurious texture with beautiful shine and depth.

①Slide a sequin onto the needle and secure it by inserting the needle down through the left edge.

②Bring the needle up about one sequin-radius ahead, insert it through the second sequin from the front, and secure it by stitching down along the left edge of the first sequin.

④Repeat steps ①–② to continue layering sequins. ★
Triangle Stitch Fill
The triangle stitch fill is a technique used to densely pack beads so that no gaps remain.
By carefully filling the fabric with beads, you can create rich, detailed, and high-density designs—perfect for intricate patterns or fine decorative areas.

①Bring the needle up, thread three beads, and insert the needle back down at a distance matching the bead length to secure them.

②Bring the needle up again, leaving about the space of one bead.

③Pass the needle through the middle bead of the three you just stitched, then insert the needle about one bead’s length ahead.
(The beads are pulled inward, turning the straight row into a triangle-like shape.)

④Bring the needle up at a suitable spot and repeat ②-③.

⑤Continue filling the area, working bead by bead.

⑥Done! ★
This method is perfect for filling large areas with beads. Any tiny gaps left over can be filled with single-bead stitches.
Brick Stitch
The brick stitch is a technique used to edge your work with beads or pearls.
Rather than stitching on the fabric surface, this method is used to create a decorative border.
It forms clean, elegant lines and enhances the overall outline of your design—perfect for projects that need a refined, delicate finish.

①Thread two pearls onto the needle.

②Stitch them down to secure.

③Pass the needle upward through the hole of the second pearl.

It will look like this.
Then thread one additional pearl and repeat ②-③.

Side view

A beautiful border is now complete.
Wrap-Up
By learning these seven basic stitch techniques, you’ll be able to create a wide variety of bead embroidery designs.
Each method adds dimension and sparkle to your work, helping you achieve beautifully detailed results.
All of these techniques are beginner-friendly, and as you practice little by little, you’ll start to discover just how deep and enjoyable the world of bead embroidery can be♪
Try wearing your own handmade bead-embroidered accessories when you go out—you’ll feel proud of your creations! (^^)/
Bonus / Recommended Bead Embroidery Kits
If you’re thinking, “I understand the techniques, but gathering all the materials from scratch seems tough…,” we’ve got great news for you!
In this bonus section, we’re introducing some easy-to-start bead embroidery kits♪
Each kit comes with the essential materials, so even beginners can start with confidence. They’re the perfect first step into the world of bead embroidery.
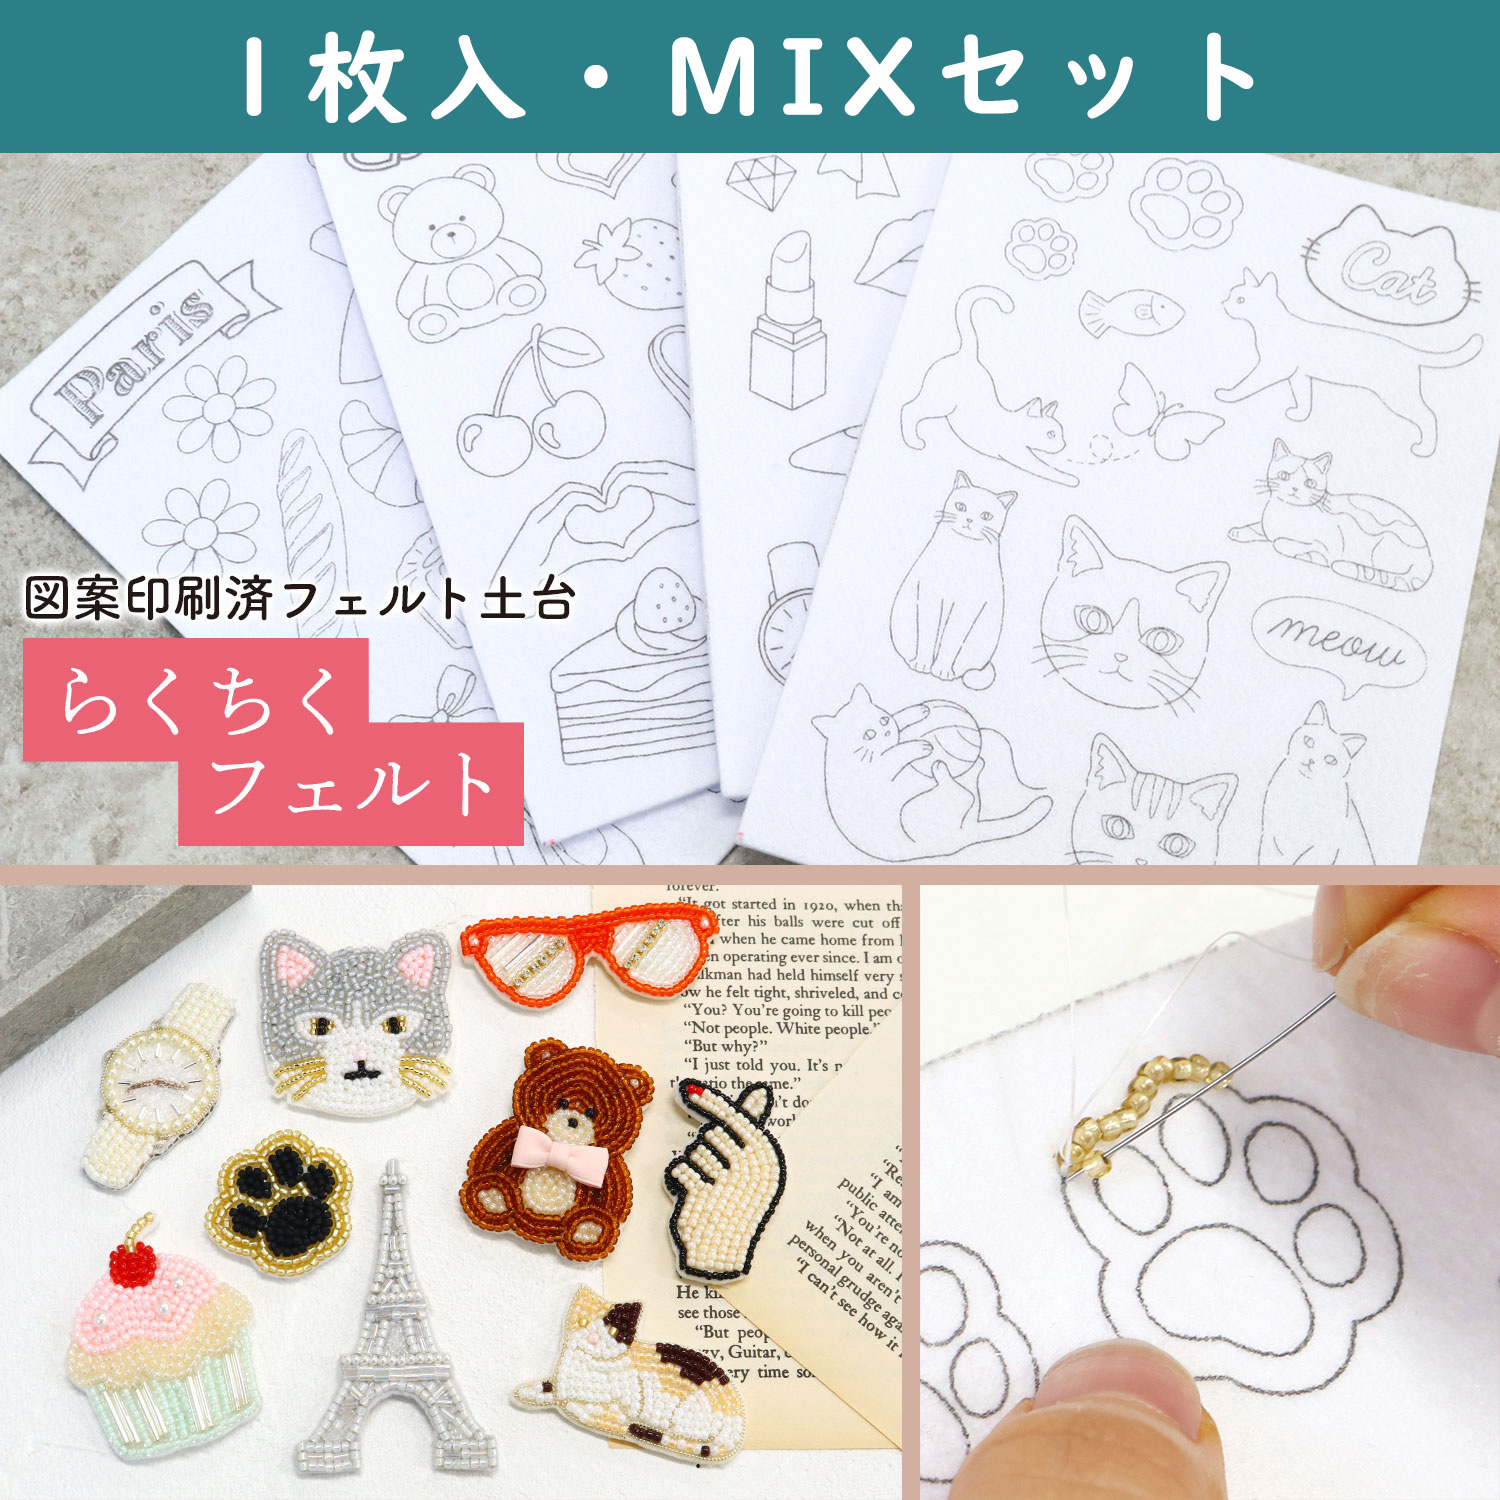
Printed Design Felt Base – “Rakuchiku Felt”
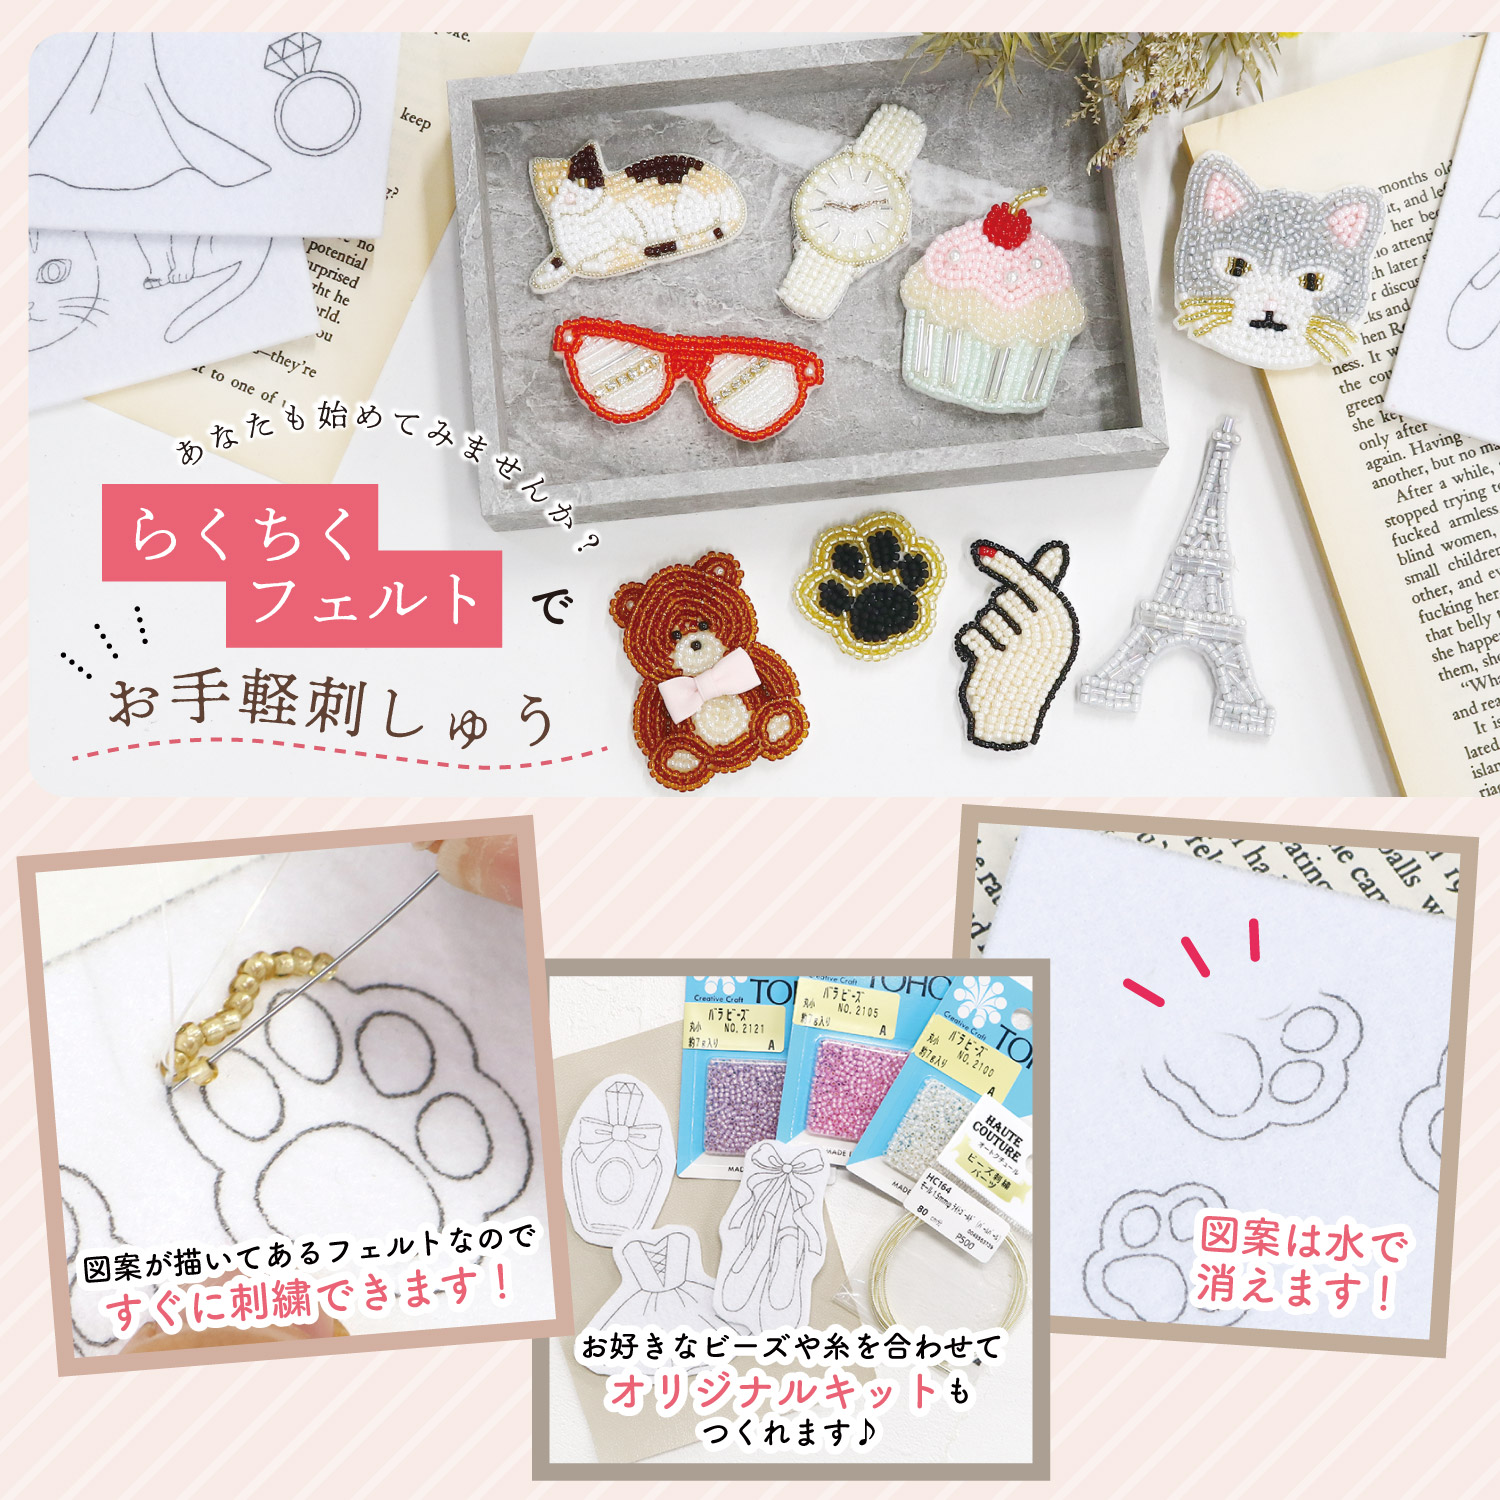
Perfect for anyone who wants to try embroidery for the first time!
Born from customer requests, Rakuchiku Felt is a felt base with the design pre-printed on the surface.
Simply follow the lines with beads or thread and you can create adorable motifs with ease.
・No need to draw your own outline
Since the design is already printed, you can start stitching right away—no prep work needed.
・Water-erasable ink
The printed guidelines wash away with water, leaving a clean and polished finish.
・A variety of fun designs
Choose from four themes: Cat, Paris, Fashion, and Kawaii.
・Make your own original kit
Combine the felt with your favorite beads and threads to create a one-of-a-kind embroidery kit.
- Size: approx. W150 × H210 mm, thickness 2 mm
- Color: White
- Design lines: Gray
- Quantity: LCF-1 to 4 … 1 sheet per pack
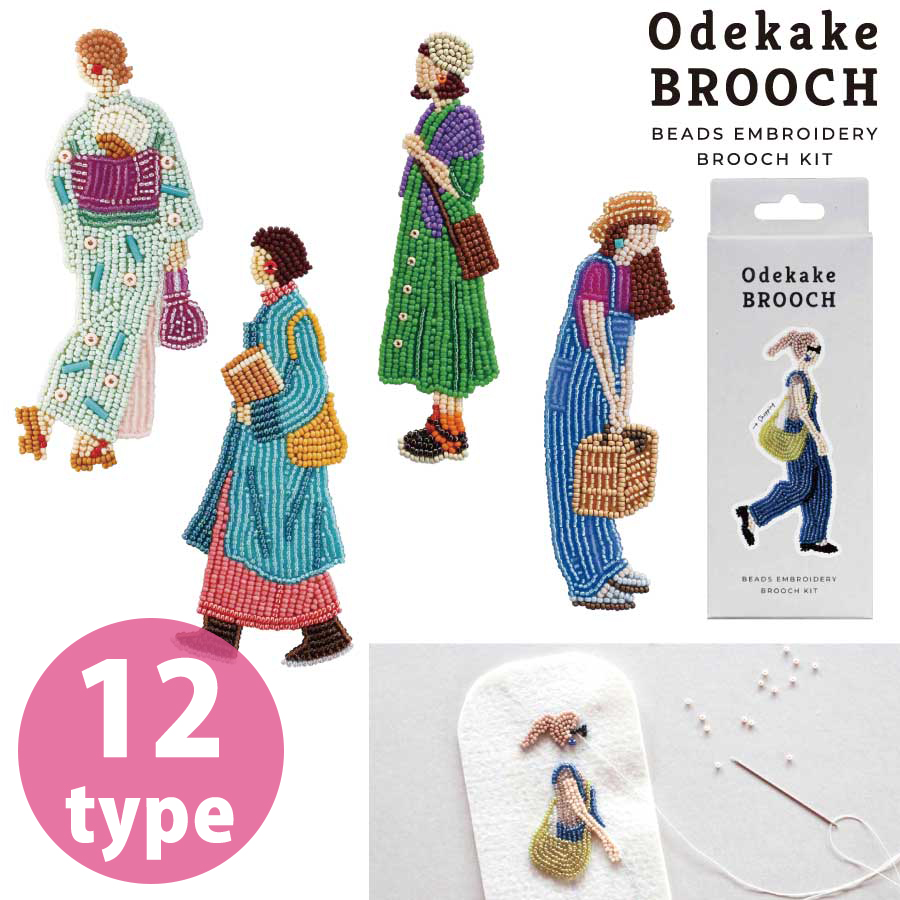
HCA14 Odekake BROOCH BEADS EMBROIDERY BROOCH KIT


“Pin on a brooch and step out for a little stroll.”
This bead-embroidery brooch kit lets you stitch directly onto felt, without using an embroidery hoop.
Since the felt base comes with the design pre-printed, you can start crafting right away. The brooch is slightly larger in size—perfect for attaching to bags.
- Set Includes: Beads, felt, backing fabric, brooch pin, thread, glue, embroidery needle, instruction sheet
- You Will Need: Fine-tipped craft scissors, ruler, pen (for tracing the design onto the backing fabric), toothpick
- Difficulty: Intermediate level
- Made in Japan
Tips for Best Results
Stitch the beads so they sit inside the printed outline on the felt.
Keeping the bead lines neat and even will give your finished brooch a beautifully polished look.
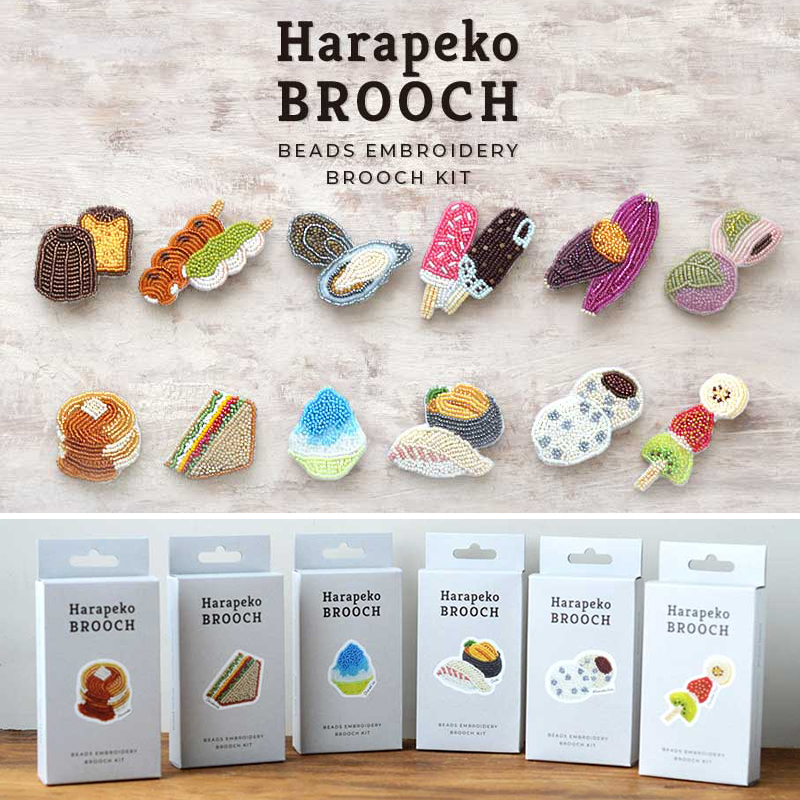
HCA20 Harapeko BROOCH BEADS EMBROIDERY BROOCH KIT

This kit lets you create a mouthwatering, fresh-looking brooch using bead embroidery.
The felt base comes with the design already printed, so even those who aren’t confident in their drawing skills can relax and enjoy the process.
The felt used in this kit is firm and thick, allowing you to stitch beads directly onto it without an embroidery hoop.
Once it arrives at your home, you can jump straight into the most enjoyable part of the making process.
- Size: See image
- Set Includes: Beads, felt, backing fabric, brooch pin, thread, glue, embroidery needle, instruction sheet
- You Will Need: Fine-tipped craft scissors
- Made in Japan

If you’d like to see more details or wish to purchase these items, please visit us in-store or browse them on Chuko Online!
※nyone can use the product search on ChukoOnline, but you’ll need to register as a member before making a purchase. Click here to register (free membership)
※「You can register here — it’s quick and free!
At our 1F Accessories & Findings Department, we offer a wide variety of tools, materials, and handy items for your crafting needs.
If you’re in the Kansai or Osaka area, please stop by and visit us!
For product inquiries, please contact us here!

We also share products and special offers on Instagram.
Please follow our Instagram account here!
Our Official Websites
Chuko Online: https://www.nippon-chuko.co.jp/shop
Facebook: https://www.facebook.com/nipponchuko
Chuko Onlineではみなさまに日々の手芸用品の仕入れを便利にしていただけるように、お得なセール情報などを更新しております! ▽Chuko Onlineのサイトはこちらから! https://www.nippon-chuko.co.jp/shop/ みなさまからのご注文をお待ちしております。